Are you ready to elevate your beat-making game? The Akai MPC 1000 is a legendary sampler and sequencer that empowers producers to unlock their creative potential. Whether you’re a seasoned musician or just starting your sonic journey, mastering the MPC 1000 opens the door to endless musical possibilities. In this comprehensive Mastering MPC 1000 Beat Making guide, you’ll learn everything from setup and basic beat making to advanced sampling techniques and creative tips. Let’s dive in and transform your musical ideas into reality!
Mastering MPC 1000 Beat Making Guide: Table of Contents

- Key Features of the MPC 1000
- Setting Up Your MPC 1000: Step-by-Step
- Beat Making Basics
- Exploring the MPC 1000’s Sampling Capabilities
- Beginner’s Beat Tutorial
- Advanced Beat Making Techniques
- Tips for Enhancing Your Creativity
- Common Mistakes to Avoid
- Conclusion: Take Your Beat Making to the Next Level
Key Features of the MPC 1000
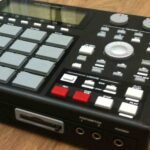
The MPC 1000 by Akai Professional is a powerhouse in music production, renowned for its:
- 16 Velocity & Pressure-Sensitive Pads: Create dynamic, expressive beats with a tactile interface.
- Onboard Multi-Track Sequencer: Arrange, edit, and refine your tracks with ease.
- Built-in Effects: Add reverb, delay, EQ, and more to individual sounds or entire sequences.
- Advanced Sampling: Record, trim, slice, and loop audio samples for endless creative options.
- Expandable Storage: Use CompactFlash cards to store and recall your sounds and projects quickly.
Setting Up Your MPC 1000: Step-by-Step
Getting started with your MPC 1000 is simple when you follow these steps:
- Unbox and Place: Ensure you have the power adapter, cables, and Quick Start Guide. Set your MPC 1000 on a stable surface.
- Power Up: Connect the power adapter and turn on your MPC 1000.
- Connect Audio & MIDI Devices:
- Plug studio monitors or headphones into the appropriate outputs.
- Connect MIDI controllers or keyboards using MIDI In/Out ports for expanded control.
- Load Sounds & Samples:
- Insert a CompactFlash card into the front slot.
- Press the “Load” button and use the jog wheel to browse and assign samples to pads.
- Adjust pitch, volume, and panning for each sound as needed.
Beat Making Basics
Beat making is the foundation of genres like hip-hop, electronic, pop, and R&B. The MPC 1000 makes this process intuitive:
- Core Elements: Start with a kick drum (low-end thump), snare (sharp snap), and hi-hats (rhythmic texture).
- Layering: Add claps, toms, and shakers for complexity and groove.
- Basslines & Melodies: Use the pads or a MIDI controller to record basslines and melodic elements.
- Arrangement: Balance your drum, bass, and melodic parts for a cohesive, professional sound.
Exploring the MPC 1000’s Sampling Capabilities
Sampling is at the heart of the MPC 1000’s creative power:
- Connect Your Source: Plug in a turntable, CD player, or instrument to the input jacks.
- Record Samples: Press “Record,” set input levels, and capture your audio.
- Edit Samples: Trim unwanted sections, normalize volume, and use the “Slice” function to chop samples into segments.
- Assign & Layer: Assign samples or slices to pads, layer multiple samples, and apply effects like reverb or filters for unique textures.
Beginner’s Mastering MPC1000 Beat Making Guide
Are you ready to elevate your beat-making game? The Akai MPC 1000 is a legendary sampler and sequencer that empowers producers to unlock their creative potential. Whether you’re a seasoned musician or just starting your sonic journey, mastering the MPC 1000 opens the door to endless musical possibilities. In this comprehensive Mastering MPC1000 Beat Making guide, you’ll learn everything from setup and basic beat making to advanced sampling techniques and creative tips. Let’s dive in and transform your musical ideas into reality!
Mastering MPC1000 Beat Making Guide: Table of Contents
- Key Features of the MPC 1000
- Setting Up Your MPC 1000: Step-by-Step
- Beat Making Basics
- Exploring the MPC 1000’s Sampling Capabilities
- Beginner’s Beat Tutorial
- Advanced Beat Making Techniques
- Tips for Enhancing Your Creativity
- Common Mistakes to Avoid
- Conclusion: Take Your Beat Making to the Next Level
Key Features of the MPC 1000
The MPC 1000 by Akai Professional is a powerhouse in music production, renowned for its:
- 16 Velocity & Pressure-Sensitive Pads: Create dynamic, expressive beats with a tactile interface.
- Onboard Multi-Track Sequencer: Arrange, edit, and refine your tracks with ease.
- Built-in Effects: Add reverb, delay, EQ, and more to individual sounds or entire sequences.
- Advanced Sampling: Record, trim, slice, and loop audio samples for endless creative options.
- Expandable Storage: Use CompactFlash cards to store and recall your sounds and projects quickly.
Setting Up Your MPC 1000: Step-by-Step
Getting started with your MPC 1000 is simple when you follow these steps:
- Unbox and Place: Ensure you have the power adapter, cables, and Quick Start Guide. Set your MPC 1000 on a stable surface.
- Power Up: Connect the power adapter and turn on your MPC 1000.
- Connect Audio & MIDI Devices:
- Plug studio monitors or headphones into the appropriate outputs.
- Connect MIDI controllers or keyboards using MIDI In/Out ports for expanded control.
- Load Sounds & Samples:
- Insert a CompactFlash card into the front slot.
- Press the “Load” button and use the jog wheel to browse and assign samples to pads.
- Adjust pitch, volume, and panning for each sound as needed.
Beat Making Basics
Beat making is the foundation of genres like hip-hop, electronic, pop, and R&B. The MPC 1000 makes this process intuitive:
- Core Elements: Start with a kick drum (low-end thump), snare (sharp snap), and hi-hats (rhythmic texture).
- Layering: Add claps, toms, and shakers for complexity and groove.
- Basslines & Melodies: Use the pads or a MIDI controller to record basslines and melodic elements.
- Arrangement: Balance your drum, bass, and melodic parts for a cohesive, professional sound.
Exploring the MPC 1000’s Sampling Capabilities
Sampling is at the heart of the MPC 1000’s creative power:
- Connect Your Source: Plug in a turntable, CD player, or instrument to the input jacks.
- Record Samples: Press “Record,” set input levels, and capture your audio.
- Edit Samples: Trim unwanted sections, normalize volume, and use the “Slice” function to chop samples into segments.
- Assign & Layer: Assign samples or slices to pads, layer multiple samples, and apply effects like reverb or filters for unique textures.
Beginner’s Mastering MPC1000 Beat Making Guide
Ready to make your first beat? Follow these steps:
- Load Your Sounds: Assign a kick, snare, and hi-hats to separate pads.
- Set the Tempo: Start at a comfortable BPM, such as 90.
- Record Drum Patterns:
- Kick on beats 1 and 3.
- Snare on beats 2 and 4.
- Hi-hats as eighth notes.
- Add Bass & Melodies: Record a bassline and simple melodic elements using the pads or a MIDI controller.
- Save Your Project: Store your beat on the CompactFlash card for future use.
Advanced Techniques for Beginners: Mastering MPC1000 Beat Making Guide
Take your beats to the next level with these advanced MPC 1000 techniques:
- 16 Levels Function: Manipulate a single sample across all 16 pads for pitch, velocity, or filter variations—great for melodic drum patterns.
- Layering Samples: Assign up to four samples per pad, each with unique settings, to create rich, complex sounds.
- Chopping & Re-sequencing: Use the “Chop Shop” to slice samples and rearrange them for new rhythms and melodies, a staple in hip-hop and electronic music.
Tips for Enhancing Your Creativity
Unlock your creative potential with these tips:
- Experiment with Genres: Sample from jazz, funk, world music, and more to discover new sounds.
- Collaborate: Work with other musicians using MIDI and project sharing for fresh perspectives.
- Embrace Mistakes: Record improvisations and explore unconventional ideas—some of the best beats come from happy accidents!
Common Mistakes to Avoid
Avoid these pitfalls to ensure a smooth workflow:
- Not Saving Regularly: The MPC 1000 does not autosave—save your work often to prevent data loss.
- Overloading Sequences: Too many sounds or effects can clutter your mix. Focus on clarity and balance.
- Improper Gain Staging: Keep audio levels consistent to avoid distortion or noise. Use metering and gain controls wisely.
Conclusion: Take Your Beat Making to the Next Level
Mastering the MPC 1000 is a journey of exploration, practice, and creativity. By understanding its features, setting it up correctly, and learning both basic and advanced techniques, you’ll build a strong foundation for your music production. Stay curious, collaborate, and don’t be afraid to experiment—your next great beat is just a session away!
Ready to elevate your beats with fresh inspiration? Don’t wait—unlock a world of creativity with our exclusive MPC 1000 sound packs! Click below to buy now and give your music the professional edge it deserves.
Ready to make your first beat? Follow these steps:
- Load Your Sounds: Assign a kick, snare, and hi-hats to separate pads.
- Set the Tempo: Start at a comfortable BPM, such as 90.
- Record Drum Patterns:
- Kick on beats 1 and 3.
- Snare on beats 2 and 4.
- Hi-hats as eighth notes.
- Add Bass & Melodies: Record a bassline and simple melodic elements using the pads or a MIDI controller.
- Save Your Project: Store your beat on the CompactFlash card for future use.
Advanced Techniques for Beginners: Mastering MPC1000 Beat Making Guide
Take your beats to the next level with these advanced MPC 1000 techniques:
- 16 Levels Function: Manipulate a single sample across all 16 pads for pitch, velocity, or filter variations—great for melodic drum patterns.
- Layering Samples: Assign up to four samples per pad, each with unique settings, to create rich, complex sounds.
- Chopping & Re-sequencing: Use the “Chop Shop” to slice samples and rearrange them for new rhythms and melodies, a staple in hip-hop and electronic music.
Tips for Enhancing Your Creativity
Unlock your creative potential with these tips:
- Experiment with Genres: Sample from jazz, funk, world music, and more to discover new sounds.
- Collaborate: Work with other musicians using MIDI and project sharing for fresh perspectives.
- Embrace Mistakes: Record improvisations and explore unconventional ideas—some of the best beats come from happy accidents!
Common Mistakes to Avoid
Avoid these pitfalls to ensure a smooth workflow:
- Not Saving Regularly: The MPC 1000 does not autosave—save your work often to prevent data loss.
- Overloading Sequences: Too many sounds or effects can clutter your mix. Focus on clarity and balance.
- Improper Gain Staging: Keep audio levels consistent to avoid distortion or noise. Use metering and gain controls wisely.
Conclusion: Take Your Beat Making to the Next Level
Mastering MPC 1000 Beat Making Guide is a journey of exploration, practice, and creativity. By understanding its features, setting it up correctly, and learning both basic and advanced techniques, you’ll build a strong foundation for your music production. Stay curious, collaborate, and don’t be afraid to experiment—your next great beat is just a session away!


